Adobe’s Dreamweaver authoring tool has features that assist you to develop accessible content. Let’s start with DreamWeaver Accessibility. First, we will go over the basic definition of Dreamweaver, and later on, concisely cover its basic features so that you can start your accessibility web development journey the right way.
What is DreamWeaver?
Dreamweaver is an accessibility tool that makes internet usage easier for auditory, visual, motor, and other disabilities. It also lets you create web content that complies with government recommendations regarding accessibility topics. It’s a popular tool for webpage development. Dreamweaver follows the WYSIWYG (What you see is what you get) principle, meaning it’s an editor that lets people create web pages without putting in a lot of time and effort for the markups and codes.
Features that DreamWeaver offers for Accessibility?
There are three main features that Adobe’s popular tool offers to developers and designers:
- Screen Readers with DreamWeaver
- Keyboard navigation
- OS accessibility support
Let’s go over each in greater detail.
Screen Readers with DreamWeaver
Screen readers recite text that shows up on the monitor, which immensely helps those with auditory and visual impairments. They read the non-textual important information, as well. That information can be button labels, descriptions of images, etc. Such non-textual information is usually found in accessibility labels or attributes. You can also add text equivalents for HTML elements to forms and tables through the accessibility dialog boxes. When designing with Dreamweaver, screen readers can help you in your development process.
The accessibility tool supports the JAWS and Window-Eyes readers.
Accessibility Dialog Boxes
To make accessible pages in this program, you should link information, like labels and descriptions, to page objects. Following this, the screen reader will be able to recite the tags and descriptions.
How do you link information to page objects? You do so by association. Activate the accessibility dialog box that requests accessibility info like labels and descriptions when you add an object you have activated the corresponding Accessibility dialog box.
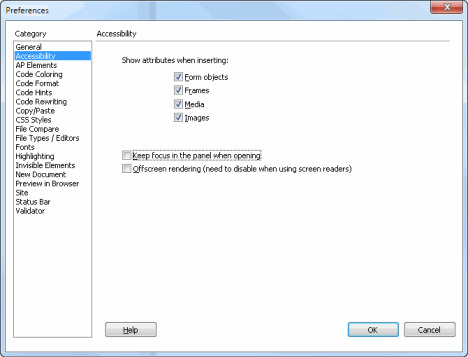
Activation of these boxes gets done via the Preferences dialog box. Accessibility dialog boxes are available for images, media, form objects, and frames. When you add Summary text to the Table dialog box and add image IDs and Alt text via the Property inspector, you have finished optimizing tables with accessibility.
Image Alternative text
Each <img> element needs to contain alternative text that stands for the content or function of the image to screen reader users. How do you add alternative text? Pick the image, and enter the alternative text in the Alt field found in the Properties box.
Headings
A good-structured heading can do wonders in terms of a website’s accessibility. Headings are frequently used by screen reader users so that they can navigate pages more efficiently. To add headings to a page, pick Insert>Heading and determine your desired heading level. If you wish to edit a heading and change its levels, select the text and the desired heading level found in the Properties panel under the Format menu.
Navigating Dreamweaver using the keyboard
Developers can use keyboard navigation to switch between different panels, dialog boxes, frames, and tables without a mouse. There are variable controls for navigating panels, the Property inspector, dialog box, frames, and tables. To give you a better understanding of how these controls work, here is an example of navigating a dialog box:
- Push the Tab key so you can toggle through the options in the dialog box.
- Toggle through preferences for an option with the help of arrow keys.
- Is there a Category list? Push Control and Tab simultaneously to focus on the category menu and move up and down the list with the arrow keys.
- Press Control and Tab once more to move to options for a category.
- To exit, push the Enter key.
Please find detailed controls on the official Adobe website at this link. Windows is the only OS that supports the keyboard controls mentioned above.
Operating system accessibility
Dreamweaver offers accessibility features both for the Windows OS and the Mac OS. We’ll go over two examples of how Dreamweaver operates on these two different operating systems.
The Windows OS’ high-contrast setting is supported, as well. That can be activated via the Control Panel. Here is how Dreamweaver reasons to it:
- A dialog box and panel both utilize system color settings. If you adjust the setting to white on black, the dialog box and panel will display a black background color and a white foreground.
- Code view utilizes the system and window text color. So if you adjust your preferences to white on black and edit text colors, Adobe’s accessibility tool will ignore those settings and show the text with a black background and white foreground.
- The design view utilizes the background and text colors you pick. Thus, the sites you develop will process the colors like a browser.
On Mac computers and laptops, you can adjust the preferences in the Universal Access Preferences dialog box. You can find it in the System Preferences section.
Conclusion
Dreamweaver is well-renowned for a reason – it excels at making responsive web pages inclusive of design and features. Regarded for its power and convenience, and periodic updates, it will give your website accessibility that follows government and inclusivity standards.


